The Game Interface
Below is all of the information that you need to navigate the Grepolis game overview. The numbers beside entries in the contents correspond to the numbers that you will find on an image of the overview below. They are there to help you understand what it is that you are looking at.
The Game Interface
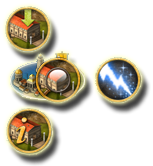
Click on the images below for more information about that part of the interface:
  |
 | |
 |
As you can see from the image above, most of the screen is given to the map view. Through the sidebars and tool bar at the top of the screen, a player can access all of the information that is needed for them to play the game.
The game screen is made up of three toolbars.
- The left sidebar is the place from which the player is able to access many key features of the game such as your Alliance Forums, your reports and the world rankings. You will also find the mini-map, which advisors are active, and the game clock.
- The right sidebar contains the god which is being worshipped in that city, the units which are currently in that city (including support troops) and your reports.
- The top toolbar shows the city name, attack notifications, buttons to switch between cities, movement indicators and also resources in the city (and, if you have Administrator activated, a 'quick-bar').
It is possible to zoom in and out while looking at this view to see more of the local ocean. To do this, press either Ctrl + to zoom in, or Ctrl - to zoom out. Use Ctrl 0 to reset the zoom level to default.
Left Bar
Here you will find information on all of the buttons on the left-hand side bar.
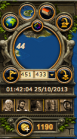
Top Part
The top half of the menu is predominately taken up by the map and its various functions, however you will also find your gold count here. There is more information in the table below:
| Image | Name | Description |
|---|---|---|
| World View Icon | Click to view the World Map view, this makes it easier for you to survey the islands around you. | |
| Island View Icon | Click to view the Island view, this focuses the map on just one island. This is the default view for the map. | |
| City View Icon | Click to open your city overview, from here you are able to queue new buildings and train units. | |
| "Go to City" Icon | Click to jump to the city that you currently have selected. | |
| Colours Icon | Click to view the flag colours for other players or alliances. | |
| Save Location Icon | Clicking this button allows you to save a location on the map, it is then added to a drop down menu next to it and you can easily jump back to that location whenever you like. | |
| Jump to Coordinates Icon | This allows you to jump to coordinates that you enter manually. | |
| Premium Icon | Click this to open the "Buy Premium" window, next to it is your balance of gold. |
You will also find information on Advisors and the game clock:
Just below the mini-map is a place which lets a player know which advisors are currently active. If the portrait is greyed out, then the advisor is not active. Clicking on any of the images will bring up the premium window. This will allow a player to choose which advisors to activate, or whether to extend their use beyond the regular 14 days.

The game clock will automatically be set to GMT+1 (UTC+1) which is the time-zone in which the servers are located. This setting can be changed under Settings, however, many players prefer to keep the clock on the default time-zone.
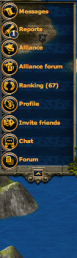
Bottom Part
The bottom half of the menu the main menu for the game, from here you are able to access some of the key features in the game such as messages, alliance forums and rankings.
| Image | Name | Description |
|---|---|---|
| Messages Icon | Click this to open the Messages window. From here you are able to start message conversations with individual players as well as large groups. You are also able to view all old messages, it is like an email inbox. You can block users if you do not wish to receive messages from them. It is also possible to create mailing lists so that you can easily message a group of players if you send them messages often. This is also where In-Game announcements from the game admins are made. | |
| Reports Icon | This button opens up the Reports overview. You receive reports for things such as Attacks (both attacks that you have made, and attacks that were directed at your cities), Support, Divine Spells and when gold has been credited to your account. | |
| Alliance Overview Icon | This opens up your alliance overview page. If you are not a member of an alliance, you will see your alliance invites displayed here as well as being presented with the option of founding your own alliance. Read the Alliances section for more information on this. If you are a member of an alliance then clicking on this will initially open a window where you can see internal announcements from your alliance leaders as well as a list of your alliance events (e.g. New members, a conquest etc). There are many tabs; if you are a leader then this is where you could change your alliance settings (Name, banner, profile etc). If you are a regular member, you are able to see a list of your fellow alliance mates as well as all alliances that you are pacted with. | |
| Alliance Forums Icon | Click here to open your alliance forums where you are able to talk with your alliance-mates. If you are not a member of an alliance, this button will be faded out and you will not be able to click on it. | |
| Rankings Icon | This button opens up the World Rankings overview. You can see stats on the following: Players Alliances Players (Ocean) & Alliances (Ocean) Player BP stats Alliance BP stats World Wonders | |
| Profile Icon | You are able to customise your in-game profile from here. You can display your own Coat of Arms here also! | |
| Invite Player Icon | Invite friends to play Grepolis! They will appear on your island (or at least one nearby) and if they are new to the game, when they reach 3000 points you will receive 200 gold. | |
| Chat Icon | This button opens up a small chat window. You can talk to members of your alliance, and only of your alliance, who are also online. This is useful when only a few are online, but it can become a bit hectic if you have many members using it at the same time! | |
| External Forums Icon | A link to the external Grepolis forums. Talk to members of the community who may not play your world, ask questions, post ideas and generally enhance your Grepolis experience! |
Top Bar
The top toolbar gives a player various information through the use of icons. A player will see the name of the city currently selected, any incoming attacks, how many trades are taking place, and what resources are held in the warehouse for that city.
City Name Scroll
This scroll is located right in the centre of the top bar. Many players tend to pick a theme to use when naming their cities, and others prefer to use a system which allows them to know which cities are in which oceans. By double-clicking on this scroll, a player can rename their current city. A single click will open up the City List and allow you to quickly select a different city without scrolling through all of them.
The arrows at either side of the name allow you to scroll through your cities, it goes through the cities in alphabetical order.
Other Buttons
| Image | Name | Description |
|---|---|---|
| Notes Button | This button will open up a notepad where you can write and save a message. You can have up to 5 different tabs at a time, each holding their own notes. | |
| Inventory Button | Click here to open your inventory. You are able to store rewards from island quests and special events here for future use. See the Inventory page for more info. | |
| Overviews Button | This button will open up the advisor overviews. You must have Administrator activated in order to see these menus. They provide information on all of your cities and it makes running a larger empire fairly simple. | |
| Units Training | This will give you details on all of the units currently being trained in the currently selected city. | |
| Troop Movements | This will give you details on all of the troop movements in and out of the currently selected city. | |
| Trade Movements | This will give you details on all of the trade movements in and out of the currently selected city. | |
| Attacks | ||
| No Attack | This is the default state of the attack icon. | |
| Attack Inbound! | When you have an incoming attack on any of your cities, the icon will appear like this and glow with the orange light behind it. It will also tell you how many attacks are coming. | |
| Attack Notification | When you are being attacked, not only will the notice light up, but this icon will appear in the lower right of the screen to let you know that there is an attack coming. This will inform you where the attack is from and when it lands. | |
Resources
This shows how much of each resource are currently stored in the warehouse. You are also shown how much free population you have left.
Quick Bar
The quick bar, found under the top menu bar, is a premium feature that you can gain access to by activating the Administrator. You are able to add links to buildings in order to get to them quickly.
In order to edit the quick bar, click on the little gear image on its left hand side. Click on "new menu item" and then enter the name that you want to be displayed and the java code for that building. The codes can be found in this table:
| Name | Code |
|---|---|
| Senate | javascript: MainWindowFactory.openMainWindow () |
| Cave | javascript: HideWindowFactory.openHideWindow () |
| Warehouse | javascript: BuildingWindowFactory.open ('storage') |
| Farm | javascript: FarmWindowFactory.openFarmWindow () |
| Timber camp | javascript: LumberWindowFactory.openLumberWindow () |
| Quarry | javascript: StonerWindowFactory.openStonerWindow () |
| Silver mine | javascript: IronerWindowFactory.openIronerWindow () |
| Market place | javascript: MarketWindowFactory.openMarketWindow () |
| Harbor | javascript: DocksWindowFactory.openDocksWindow () |
| Barracks | javascript: BarracksWindowFactory.openBarracksWindow () |
| City wall | javascript: BuildingWindowFactory.open ('wall') |
| Academy | javascript: AcademyWindowFactory.openAcademyWindow () |
| Temple | javascript: TempleWindowFactory.openTempleWindow () |
| Agora (defence) | PlaceWindowFactory.openPlaceWindow ('index', open) |
| Troops Outside | PlaceWindowFactory.openPlaceWindow ('units_beyond', open) |
| Simulator | PlaceWindowFactory.openPlaceWindow ('simulator', open) |
| Culture | PlaceWindowFactory.openPlaceWindow ('culture', open) |
Right Bar
The right sidebar provides information about the god currently being worshipped in the city, a count of the total troops in the city, and your Heroes control panel.
Buttons
There are a number of buttons at the top of the right menu bar, details on these can be found below:
| Image | Name | Description |
|---|---|---|
| Settings Button | The settings page, customise things such as how many windows you can have open, whether or not the Night Graphics are enabled and change your password (you can obviously change many other settings though!) You are also able to submit support tickets from here. | |
| Sounds Button | Click here to open the settings for the Sounds. | |
| Wiki Button | A link to the Grepolis Wiki, which you are currently browsing. | |
| Log Off | Log off your current world. | |
| Spells Button | Opens a menu from which you will be able to cast spells (if you have enough favour). |
God and Favour

The upper right corner of the sidebar gives a portrait of the god being worshipped in the selected city. The amount of favor a player has will be given under the portrait.
By clicking on the image of the lightning bolt, you will be shown a list of the spells that can be cast on that city. All spells for all gods being worshipped will be available. You will only be able to cast spells if you have enough favor.
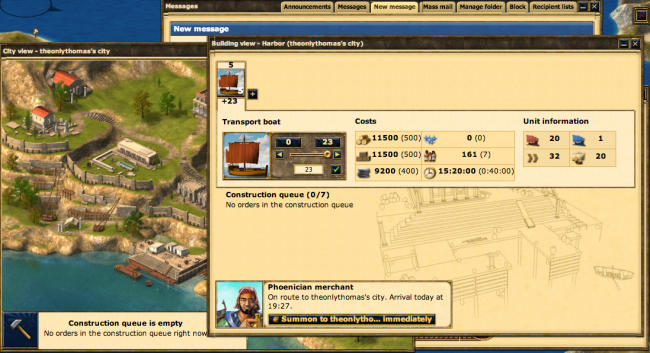
Units
Underneath the portrait of the worshipped god, is the troop indicator. Troops shown here are also inclusive of support troops currently stationed in the city. There are also links to the barracks and harbour.
Notifications
You are provided with a constant stream of Notifications on the right hand side of your map. You get notified about many things here, these are:
- Building-work completion
- Trade
- Divine Powers
- Messages
- Reports
- Attack planner warnings
Main Screen
The main bulk of your screen is the play-area. When all windows are closed, you will see your island, you can click and drag to navigate around the world (or switch to the World View to make it a bit easier). It is in this view that you are able to interact with other players as well as NPC Farming Villages.
 |
When you click to open a window, it will open like a pop up. You are able to have up to 10 windows open at once (you can control this limit in the Setting menu) and can click and drag to move them around. Clicking the red 'X' in the top right of this area will close all of the windows.
 |
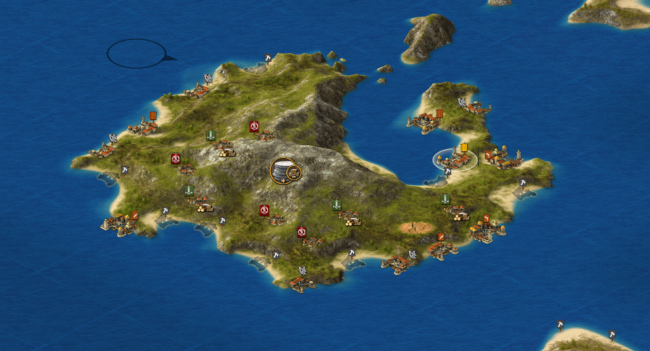
Map Details
There are a number of details which appear on the map, most of which are specific to the island on which your city is located.
Island Details
In the center of each island, there is an icon which displays the fertility of the island's resources. There will be one resource which is more abundant than the others, and one resource which is more scarce than the others. Adapting your build strategy to these changes in resources will help to improve your ability to get your city up to speed quickly.
- For instance, if you have a +silver and -wood island, having Poseidon as your worshipped god and taking over the villages which trade for wood will be helpful in the early stages of the game.
| Icon | More | Less |
|---|---|---|
| Wood | Stone | |
| Wood | Silver | |
| Stone | Wood | |
| Stone | Silver | |
| Silver | Wood | |
| Silver | Stone |
City Details
| Image | Description |
|---|---|

|
This is one of your cities. |

|
This city belongs to a member of your alliance. |

|
This city belongs to a member of an alliance which has a pact with your alliance. |

|
This city is owned by a member of an enemy alliance. |

|
The owner of this city is not part of any alliance or their alliance has no relations with you. |

|
This is an abandoned city and belongs to no one. It will shrink daily until it disappears completely. See Ghost Towns for more information. |
- It is also possible to assign colors to players and/or alliances so that only you see them in this new color. You can do this by clicking on a city, select Info and next to the player's name/alliance there is a little colored box. It is there that you can select a new color for them.
Like the way in which your buildings change and evolve, so too will your city on the map. As you increase in points, the city will grow larger and appear more grand in comparison to other cities.
| City Expansion | ||||
|---|---|---|---|---|

|

|

|

|

|
| 0-599 points | 600-2,399 points | 2,400-5,399 points | 5,400-9,999 points | 10,000+ points |
City Options
When you click on a city controlled by another player, you will be given 7 options to chose from. These options include peaceful actions, and hostile actions.
- Note: Abandoned cities will only allow you 5 of these options.
In the left hand column in the table below you will see two menus. The one on the top is the menu that you are presented with when you click on another player's city, the one on the bottom is the menu you are presented with when you click on one of your own cities.
| Menus | Option | Description |
|---|---|---|

|

|
Provides information about the current owner and alliance of the city. |

|
Opens the City Overview of the city. This replaces the Info Button if you control the city. | |

|
This allows you send troops and/or ships to help another player defend their city. | |

|
This will open up the attack window and allow you to determine what troops to send when attacking the city. | |
|

|
When you have a market built you will be able to trade with other cities. Not available for Ghosts. |

|
Once you have a temple built you can enact spells provided you have enough favor. Not available for Ghosts. | |

|
After you have built a cave you can use this to send spies provided you have enough silver. | |

|
This will center the map over the city you are looking at. |
Clicking on an empty anchor spot on the map will present you with two options:
| Button | Description |
|---|---|
| Click here to open the colonisation menu, from here you are able to send a Colony Ship to Colonise the empty anchor point. | |

|
Click here to invite friends who do not already play in your world. If they are not already playing other worlds, and are completely new players, you will be rewarded with 200 gold if they reach 3000 points. |
The island view is easily moved and you can drag and drop it to get a better view. It allows you to move your map around to see neighbouring islands. It is quite easy to use as long as the distances are not too great.
World Map

The world is divided into 100 oceans in a grid layout, and each ocean is numbered from 0-99. The number of the ocean correspond to the (X,Y) location in the world. The first number is the beginning of the X coordinate, and the second number is the start of the Y coordinate.
In addition to the oceans, the world can be divided into 4 quadrants which correspond to the ordinal directions on a compass. They are in clockwise order: NE (Blue), SE (Purple), SW (Green), and NW (Red). The direction in which you choose when you join the game will impact on what alliances are located near you.
The world can also be divided into regions: Core Oceans, Expansion Oceans, and The Rim. Many players agree that the Core is made up of Oceans 44, 45, 54, and 55 as they are located in the exact center of the world. The Expansion Oceans are those which surround the Core. The exact number of these oceans depends on the world and how active it is. Beyond the Expansion Oceans is The Rim. New players and those players who have lost all of their cities or restarted will be found here. As more players join or others are conquered, The Rim moves further out towards the edges of the world.