The Game Interface
The map is the main screen through which Grepolis is played. A player has an isometric view of their island and the local area. The player can scroll the map to look around, or use the (X,Y) coordinate system to move to a distant part of the map. The map is also the main way to keep your ever-growing empire working.
The 2.0 Map Interface

As you can see from the image above, most of the screen is given to the map view. Through the sidebars and tool bar at the top of the screen, a player can access all of the information that is needed for them to play the game.
On the left sidebar, a player will see the mini-map, which advisors are active, the main links for various tasks, and the game clock. The right sidebar contains the god which is being worshipped in that city, and the units which are currently in that city (including support troops). Finally, the top toolbar shows the city name, attack notifications, buttons to switch between cities, movement indicators and also resources in the city.
Left Sidebar
The left sidebar contains the mini-map, shows you which advisors are currently active, and also provides links to a number of game settings.
The Mini-Map

The mini-map show's a smaller version of your local area in the ocean. Cities appear as colored dots and reflect the state of affairs between your cities and other cities. The ocean number appears in the upper left corner of the mini-map and if you hover the mouse over the mini-map, in the lower left corner a magnifying glass will appear. If clicked, this will replace the main map with an expanded version of the mini-map.
Beneath the mini-map you will find the (X,Y) coordinate system, and 4 buttons. By entering values between 000-999 in either the X or the Y boxes, you can view any place in the world. There are 4 buttons next to the map coordinates. The table below explains their functions.
| Button | Name | Description |
|---|---|---|
| Jump to These Coordinates | Takes the map to the coordinates entered in the (X,Y) boxes. | |
| Save This Location | Saves the current (X,Y) coordinates. | |
| Color Assignments | Provides a legend detailing which colors are assigned and for what purpose. | |
| Jump to Current City | Takes the map back to the currently selected city. |
Advisors
Just below the mini-map is a place which lets a player know which advisors are currently active. If the portrait is greyed out, then the advisor is not active. Clicking on any of the images will bring up the premium window. This will allow a player to choose which advisors to activate, or whether to extend their use beyond the regular 14 days.
Scroll Links


These two images provide an idea of what the scroll will look like. The image on the left is what will appear when a player is not in an alliance. The image on the right is what players in an alliance will see. From this scroll a player can quickly access the City Overview, messages and reports, alliance forums, the rankings list, the game settings, player profile, and the external game forums. For many players this is the heart of the Grepolis interface.
Game Clock
The game clock will automatically be set to GMT+1 (UTC+1) which is the timezone in which the servers are located. This setting can be changed under Settings, however, many players prefer to keep the clock on the default timezone.
Top Toolbar
The top toolbar gives a player various information through the use of icons. A player will see the name of the city currently selected, any incoming attacks, how many trades are taking place, and what resources are held in the warehouse for that city.
City Name Scroll

This scroll is located just above the mini-map and the left sidebar. Many players tend to pick a theme to use when naming their cities, and others prefer to use a system which allows them to know which cities are in which oceans. By double-clicking on this scroll, a player can rename the current city. A single click will open up the City List and allow you to quickly select a different city without scrolling through all of them.
Attack Notice
| Image | Description |
|---|---|
| This is the default state of the attack icon. | |
| When you have an incoming attack on any of your cities, the icon will appear like this and flash with the orange light behind it. It will also tell you how many attacks are coming. | |
| When you are being attacked, not only will the notice light up, but this icon will appear in the lower right of the screen to let you know that there is an attack coming. |
City Scrolling
This set of icons allows you to move through your cities and oversee your cities. It's a simple scrolling method which is used and it goes through the cities in alphabetical order. The first icon allows a player to open up the city overview, the same as the link on the left sidebar. The tablet opens up your notepad, and the all-seeing eye pyramid gives access to the various advisor overviews.
Movements and Orders
This set of icons contains information about all troop movements, recruitments, and trades. By hovering the mouse over each icon, a player can see a drop-down list of the times left for recruiting orders, attack count-downs, and remaining time before trades are completed.
Resources and Population
This shows how much of each resource are currently stored in the warehouse. You are also shown how much free population you have left.
Right Sidebar
The right sidebar provides information about the god currently being worshipped in the city and also a count of the total troops in the city.
Olympian and Favor

The upper right corner of the sidebar gives a portrait of the god being worshipped in the selected city. Around the portrait is the favor meter. The higher the favor, the more the blue line will wrap around the portrait. The amount of favor a player has will be given to the right of the portrait.
By clicking on the image of the lightening bolt, you will be shown a list of the spells that can be cast on that city. All spells for all gods being worshipped will be available. You will only be able to cast spells if you have enough favor.
Land Troops

Underneath the portrait of the worshipped god, is displayed the troop indicator. This panel can be expanded to show all available troop types in the city as shown by clicking on the arrow under the bottom row. Troops shown here are also inclusive of support troops currently stationed in the city.

Just like the land troops, this section shows all of the current naval units within the city. The panel can also be expanded to show the available types which can be made within the city. Support troops are also included in the numbers.
The New 2.0 Interface

| Number: | Description |
|---|---|
| 0 | This is a snap-shot of the new Grepolis interface. The map is now always in the background. |
| 1 | The 'Mini-map'- Double clicking this will zoom-out the map to the 'World View'; also, your ocean number is displayed in the top left. |
| 2 | Your co-ordinates are displayed here; you can use these to quickly jump to a specific location. The first number of each co-ordinate tells you your ocean number. e.g. X: 456 and Y:789 would be in as ocean: 47. |
| 3 | These little faces are the 5 Premium features which you can activate if you purchase some gold. Each feature gives you different benefits. If you have a feature activated it is displayed as a coloured image, if not, then it is black and white. |
| 4 | This is your side bar. From here you can quickly access: Your City Overview, Messages, Alliance, Alliance Forums, Settings, your personal profile, the world rankings, the grepo-chat and a few other things. It is the heart of the Grepolis Interface. |
| 5 | The server time and date is showed here. Usually this is set to UCT+1 but you can change that in your 'settings'. |
| 6 | This little cursor is always pointing towards your currently selected city. |
| 7 | The yellow flag above this city tells you that it belongs to you. |
| 8 | The green flag above this city tells you that it belongs to an allied player, a pop-up will appear if you try to attack an ally's city. |
| 9 | The red flag above this city tells you that it belongs to an enemy. |
| 10 | Each island produces more of one resource and less of one resource. In this case, more wood and less silver. |
| 11 | The blue flag above this city tells you that it belongs to a player in your alliance. |
| 12 | A farming village which you do not yet control. |
| 13 | A ghost town. This used to belong to a player, but they have left the game. This city will slowly loose points over time. |
| 14 | This window shows you which troops you have in your city. You can also select a unit type and it displays how long it will take for that unit type to get from your selected city to wherever the cursor is. |
| 15 | Your worshipped god is displayed here as well as your current favour with that god. If you hover over the favour number you are told the rate at which favour is being produced. If you click on the little lightening bolt, a new pane opens up, this is where you can cast powers on your current city. |
| 16 | Your current free population is displayed here. You need free population to train new units and built new buildings (excluding the cave, warehouse and farm). |
| 17 | The resources which you have in your city are displayed here. If you hover over a resource you are told your warehouse capacity and the rate at which that particular resource is being produced. |
| 18 | The premium task bar. This comes with the 'Administrator' premium feature and allows you to navigate around your buildings faster. |
| 19 | From right to left- This tells you about any incoming or outgoing trade activities.
This tells you about any incoming or outgoing troop movements (support or attacks). This tells you about any units you are training. This is a premium task bar which comes with the 'Administrator'. The 'note-pad' which comes with the 'Administrator'. These two arrows allow you to switch between cities. This opens the 'City Overview' window. |
| 20 | This is your city's name. You can change this by double clicking on it. |
More details about cities:
 -
-

| Colour | Description |
|---|---|
| This is your city. | |
 - Brown Flag - Brown Flag
|
This City belongs to a player who is either not in an alliance or is in an alliance which has no diplomatic relations with you. |
 - Blue Flag - Blue Flag
|
This City belongs to a player who is In your alliance. |
 - Red Flag - Red Flag
|
This City belongs to a player who is in an enemy alliance. |
 - Grey Flag - Grey Flag
|
This City used to belong to an active player but this player has quit the world, it has become a 'Ghost Town'. This city will slowly loose points over time. |
 - Green Flag - Green Flag
|
This City belongs to a player who's alliance is allied to your own. |
It is also possible to assign colours to players/alliances so that only you see them in this new colour. You do this by clicking on a city, click in 'info' and next to the player's name/alliance there is a little coloured box. It is there that you can select a new colour for them.
More Map Details
With the 2.0 came the new interface which i have explained above. In 2.0 there are 3 different zoon levels:
- City overview.
- The island view (which is always in the background now).
- The world view, this allows you to see more of an ocean, cities are displayed as coloured dots.
City Options-
If you click on a farming village which you control you have 5 options:
| Option | Description |
|---|---|
| TThis opens up a window where you can 'demand' resources without the mood in the village dropping. | |
| This opens up a window where you can send resources to 'expand' the farming village. | |
| This opens up a window where you can 'loot' resources from the Farming Village, you will suffer a decrease in mood but you receive twice as many resources as you gain from 'Demanding'. | |
| This opens a window where you can demand units from the farming village, this does result in a mood decrease. | |
| This opens a window which allows you to trade resources at a beneficial rate. You can only Trade if you have a Market built. |
If you click on a farming village which you do not control a window will open where you can see the defence in the farming village, you can see the troop numbers you will need to have before being able to take the village and you can select units to send to take over the village.
In player held cities you have 7 options. These include friendly trade and sending an army!
In a ghost town, though, you only have 4 of these options. They are Attack, Support, Info, and Espionage.
| Option | Description |
|---|---|
 - Info - Info
|
Information which gives you the current statistics of the village, such as who owns it and which alliance that player belongs to. |
 - Support - Support
|
This allows you send troops and/or ships to help another player defend their city. |
 - Attack - Attack
|
This is where you decide what type of unit to send, if you are attacking off of your island you need to have sufficient transport ships to carry all your troops. Typically the attacking troops and ships are: Slingers, Hoplites, Horsemen, Chariots, catapults and light ships (Triremes can also be used). If you are playing a 'Revolt' world you need to select whether the attack will be a Revolt attack or not. |
 - Trade - Trade
|
Allows you to send resources to the city. You can only Trade if you have a Market built and can only trade off your island if the market is at level 10 or higher. |
 - Spells - Spells
|
With your Temple built you can gain Divine Favours which are used to either assist yourself or allies or hinder other players. Here is where you activate those powers. (You need sufficient favour from your god to enact these powers). |
 - Espionage - Espionage
|
This is where you send your Espionage from so you can learn the current status of your enemy. To do this, you first must have a cave with some silver in it; the minimum cost of sending a spy is 1000. Each time you level up your temple you gain the ability to put 1000 more silver in your cave (note that once it is in there you cannot get it out, it can only be used for spying). If your spy attempt is successful you get a report in which you can see the troops in the city and the current building levels, if you are unsuccessful that person looses however much silver you spied with from their cave and they get a report telling them that you spied ont them. |
 - Go To - Go To
|
The map is easily moved and you can drag and drop it to get a better view. It allows you to move your map around to see neighbouring islands. It is quite easy to use as long as the distances are not too great. While it is possible to view the entire world in this view it would be far easier to use the World Map view for that. |
The island view is easily moved and you can drag and drop it to get a better view. It allows you to move your map around to see neighbouring islands. It is quite easy to use as long as the distances are not too great. While it is possible to view the entire world in this view it would be far easier to use the World Map view for that.
World Map
"Armed forces abroad are of little value unless there is prudent counsel at home" - Cicero
Wish to see

in a wider view? Clicking on the small compass changes the main view to that of the world map. From here you can see who is on neighbouring islands and plan your world domination. You can move around the map by dragging and dropping the picture.
If you wish to get a closer view of any island that interests you or to see a city better just double click and it will alter the picture to a close up view. Here you can call up the context menu for each city just as on your own island.
When you are in the 'World Map' view, cities are displayed only as coloured dots.
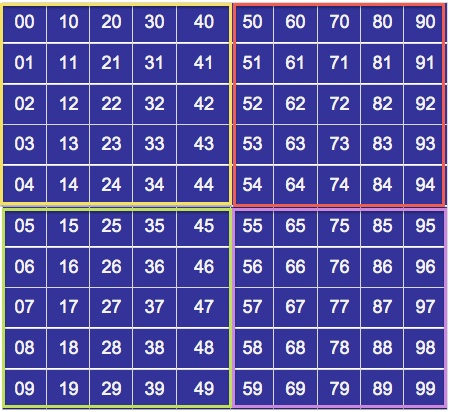
The world is divided into 100 oceans, the world is essentially a big grid, here is how the oceans are arranged:

![[1]](http://img26.imageshack.us/img26/8591/34166458.png)
Right at the start of the game you are given a choice as to which direction you start in, these are:
-NW (Yellow on the map above)
-SW (Green on the map above)
-NE (Red on the map above)
- SE (Purple on the map above)
Which direction you choose to start in has no effect on you game play, however if you are joining late in a world then you may select a direction where lots of people have chosen and so will find it very hard to grow, if this happens i would recommend 'Restarting'; you can do this in your 'Settings' menu.